
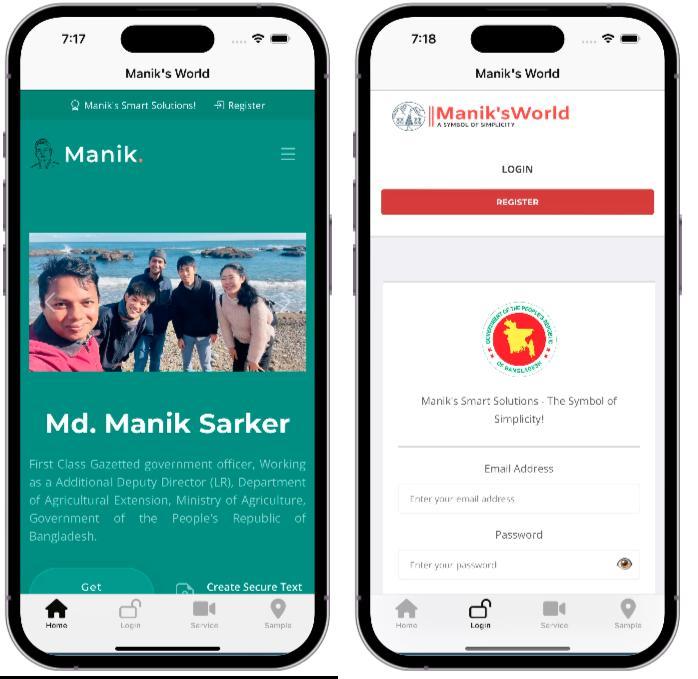
Convert Your Website to a Mobile App Using React Native
In today's mobile-first world, having a dedicated mobile application for your website can significantly enhance user experience and engagement. In this blog post, I will walk you through the steps I took to convert my website into a mobile app using React Native and Expo.
Step 1: Setting Up Your Environment
Install node, java and ndroid-tools-adb on your local computer
sudo apt install -y nodejs #Install Node.js
sudo apt install default-jdk #Install Java
sudo apt install android-tools-adb #Install ADB

# create a new directory for your project and navigate into it:
mkdir WebToMobile
cd WebToMobile

npm install -g expo-cli #install Expo CLI globally
expo init native-demo #initialize a new Expo project
Step 2: Install Required Packages
cd native-demo/ #Navigate into your project directory
npm install --save react-native-webview #Install Required Packages
Step 3: Edit Your App Component
Open `App.js` in your code editor (e.g., VSCode) and replace its content with the following code:
import React, { Component } from 'react';
import { View, BackHandler, Platform } from 'react-native';
import { WebView } from 'react-native-webview';

export default class App extends Component {
  constructor(props) {
    super(props);
    this.webView = {
      canGoBack: false,
      ref: null,
    };
  }

  onAndroidBackPress = () => {
    if (this.webView.canGoBack && this.webView.ref) {
      this.webView.ref.goBack();
      return true;
    }
    return false; // Allow default behavior if not going back
  };

  componentDidMount() {
    if (Platform.OS === 'android') {
      BackHandler.addEventListener('hardwareBackPress', this.onAndroidBackPress);
    }
  }

  componentWillUnmount() {
    if (Platform.OS === 'android') {
      BackHandler.removeEventListener('hardwareBackPress', this.onAndroidBackPress);
    }
  }

  render() {
    return (
      <View style={{ flex: 1 }}>
        <WebView
          ref={(webView) => { this.webView.ref = webView; }}
          onNavigationStateChange={(navState) => { this.webView.canGoBack = navState.canGoBack; }}
          automaticallyAdjustContentInsets={false}
          source={{ uri: 'http://smmanik.com/' }}
          javaScriptEnabled={true}
          domStorageEnabled={true}
          startInLoadingState={true}
          style={{ marginTop: 25 }}
        />
      </View>
    );
  }
}
Step 4: Configure Your App
Edit the `app.json` file to configure your app settings:
{
  "expo": {
    "name": "Manik's-World",
    "slug": "maniks-world",
    "privacy": "public",
    "sdkVersion": "51.0.0",
    "platforms": [
      "ios",
      "android",
      "web"
    ],
    "version": "1.0.0",
    "orientation": "portrait",
    "icon": "./assets/icon.png",
    "userInterfaceStyle": "light",
    "splash": {
      "image": "./assets/splash.png",
      "resizeMode": "contain",
      "backgroundColor": "#ffffff"
    },
    "updates": {
      "fallbackToCacheTimeout": 0
    },
    "assetBundlePatterns": [
      "assets/*"
    ],
    "ios": {
      "bundleIdentifier": "com.smmanik.maniksworld",
      "buildNumber": "1.0.0",
      "supportsTablet": true
    },
    "android": {
      "package": "com.smmanik.maniksworld",
      "versionCode": 2
    },
    "description": "Manik's Smart Solutions - The Symbol of Simplicity!",
    "extra": {
      "eas": {
        "projectId": "2109a8c1-217a-461b-aabb-67df9980bea0"
      }
    }
  }
}
Step 5: Build the APK
First, install EAS CLI if you haven't already:
npm install -g eas-cli
eas login #log in to your Expo account
eas build -p android #build your aab and it will store at ESA account
Once the build is complete, download the .aab file from the Expo dashboard. You will receive a link to access your build, where you can download the generated Android App Bundle (AAB) file.
Step 6: Generate the Signing Key
You need a signing key (my-release-key.jks) to publish your app. Generate it using the following command:
keytool -genkey -v -keystore my-release-key.jks -keyalg RSA -keysize 2048 -validity 10000 -alias my-key-alias
Step 7: Generate Device Specifications
You can create a device specification file to tailor the APK for specific devices: before that please connect your Android device your computer via USB with USB debugging mode.
then bundletool from this link and rename it as a bundletool
adb shell pm list features > device-spec.txt
java -jar bundletool.jar get-device-spec --output='device-spec.json'
Step 8: Build APKs with BundleTool
Then, use `bundletool` to build apks file to using my-release-key.jks with the command:
java -jar bundletool.jar build-apks --bundle='smmanik.aab' --output='smmanik.apks' --mode=universal --ks='my-release-key.jks' --ks-key-alias=my-key-alias --ks-pass=pass:Password123 --key-pass=pass:Password123
Step 9: Extract the APKs
Extract the APKs using the command below:
java -jar bundletool.jar extract-apks --apks='smmanik.apks' --output-dir='/media/manik/TWOTB/WebDevelopment/WebToMobile/apps' --device-spec='device-spec.json'
Conclusion
Following these steps, I successfully converted my website into a mobile app using React Native and Expo. This approach not only allows me to reach more users but also enhances the accessibility and functionality of my services. Now, users can easily access my website from their mobile devices, providing them with a seamless experience. Happy coding!

0% Positive Review (0 Comments)