
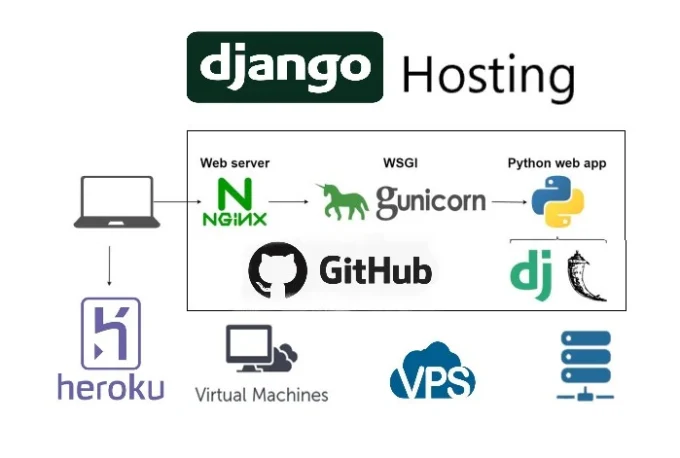
How to Point Domain and Deploy Django Project using GitHub on Gunicorn & Nginx Remote Server or VPS
Gunicorn (Green Unicorn) is a popular WSGI (Web Server Gateway Interface) server for Python web applications like Django. It acts as a bridge between the web server (like Nginx) and the Django application, handling incoming requests and passing them to Django for processing.
Step-by-Step Guide
On Your Local Machine
-
Project Setup and Preparation
-
Open Terminal.
-
Activate your virtual environment.
-
Optionally, install
django-extensionsfor managing.pycand cache files:pip install django-extensions -
Add
django-extensionstoINSTALLED_APPSinsettings.py:INSTALLED_APPS = [ ..., 'django_extensions', ..., ] -
Create a
requirements.txtfile:pip freeze > requirements.txt -
Deactivate the virtual environment.
-
-
Accessing the Remote Server via SSH
-
Connect to your remote server using SSH:
ssh -p PORT USERNAME@HOSTIP
-
-
Verifying Installed Software
-
Check if required software like Nginx, Python, pip, SQLite (bundled with Python), and Git are installed:
nginx -v python --version # or python3 --version pip --version python -c "import sqlite3; print(sqlite3.sqlite_version)" git --version -
Install necessary software if not already installed:
sudo apt install nginx sudo apt install python3-pip sudo apt install git
-
-
Setting Up Virtual Environment
-
Install
virtualenvif not already installed:sudo pip install virtualenv -
Verify and activate virtual environment on the server:
virtualenv env_name source env_name/bin/activate
-
-
Configuring Nginx and Gunicorn
-
Check Nginx status:
sudo service nginx status -
Ensure firewall allows web server ports:
sudo ufw status verbose -
Exit from remote server:
exit
-
Domain Configuration
-
Configuring DNS Records
-
Login to your domain provider's website.
-
Navigate to the DNS management section.
-
Add the following DNS records:
Type Host/Name Value A @ Your Server IP A www Your Server IP AAAA @ Your Server IPv6 AAAA www Your Server IPv6
-
Deploying the Django Project
-
Copying Project Files
-
Copy your Django project to the server using either command prompt or GitHub:
Using Command Prompt:
-
Zip your project folder on Windows.
-
Transfer the zip file to the server:
scp -P Remote_Server_Port Source_File_Path Destination_Path -
SSH into the server, unzip the project:
unzip zip_file_name
Using GitHub:
-
Push your project to GitHub as a private repository.
-
Set up SSH keys between the server and GitHub.
-
Clone the project on the server:
git clone ssh_repo_path
-
-
-
Setting Up Gunicorn
-
Install Gunicorn in the virtual environment:
pip install gunicorn -
Create Gunicorn socket and service files:
sudo nano /etc/systemd/system/your_domain.gunicorn.socket[Unit] Description=your_domain.gunicorn socket [Socket] ListenStream=/run/your_domain.gunicorn.sock [Install] WantedBy=sockets.targetsudo nano /etc/systemd/system/your_domain.gunicorn.service[Unit] Description=your_domain.gunicorn daemon Requires=your_domain.gunicorn.socket After=network.target [Service] User=username Group=groupname WorkingDirectory=/home/username/project_folder_name ExecStart=/home/username/project_folder_name/virtual_env_name/bin/gunicorn \ --access-logfile - \ --workers 3 \ --bind unix:/run/your_domain.gunicorn.sock \ inner_project_folder_name.wsgi:application [Install] WantedBy=multi-user.target -
Start and enable Gunicorn socket and service:
sudo systemctl start your_domain.gunicorn.socket
sudo systemctl start your_domain.gunicorn.service
sudo systemctl enable your_domain.gunicorn.socket
sudo systemctl enable your_domain.gunicorn.service
-
-
Configuring Nginx
-
Create a virtual host file for your domain:
sudo nano /etc/nginx/sites-available/your_domain
server { listen 80; listen [::]:80; server_name your_domain www.your_domain; location = /favicon.ico { access_log off; log_not_found off; } location / { proxy_set_header Host $http_host; proxy_set_header X-Real-IP $remote_addr; proxy_set_header X-Forwarded-For $proxy_add_x_forwarded_for; proxy_set_header X-Forwarded-Proto $scheme; proxy_pass http://unix:/run/your_domain.gunicorn.sock; } location /static/ { root /var/www/project_folder_name; } location /media/ { root /var/www/project_folder_name; } } -
Enable the virtual host by creating a symbolic link:
sudo ln -s /etc/nginx/sites-available/your_domain /etc/nginx/sites-enabled/
-
Check Nginx configuration:
sudo nginx -t
-
Restart Nginx to apply changes:
sudo systemctl restart nginx
-
-
Final Checks and Operations
-
If you encounter
DisallowedHosterrors in Django, updateALLOWED_HOSTSinsettings.py:ALLOWED_HOSTS = ['your_domain', 'www.your_domain']
-
Restart Gunicorn whenever changes are made to the Django project:
sudo systemctl daemon-reload
sudo systemctl restart your_domain.gunicorn
-
For automation using GitHub Actions, create deployment scripts and workflows to automate the deployment process.
-
Conclusion
By following these steps, you have successfully pointed your domain to a remote server or VPS, deployed your Django project using GitHub, Gunicorn, and Nginx. This setup allows you to efficiently manage and serve your Django application to users over the internet.

100% Positive Review (1 Comment)
Sara Wilsson
Nice Explanation, A complete guidelines about Django project deployment on virtual private server.