
How to Change Cell/Pixel Size (Resampling) of a Raster Using ArcGIS, QGIS, and Python
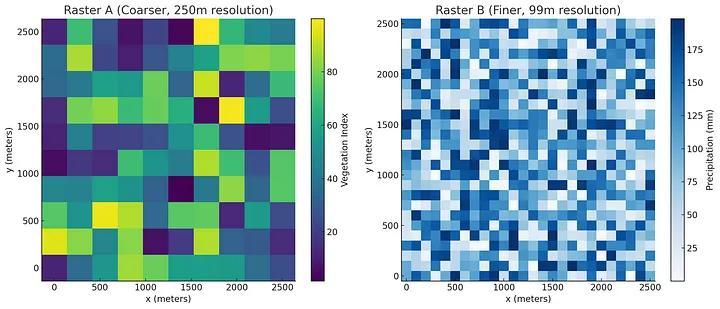
Working with raster data often requires adjusting the pixel size to meet analysis or visualization needs. This blog post will guide you through changing the cell size of a raster using three popular methods: ArcGIS, QGIS, and Python. Each method has its unique features, so you can choose the one that best fits your workflow.
Why Change Pixel Size?
Changing the pixel size of a raster is essential for various reasons:
- Analysis Requirements: Different analyses may require specific resolutions for accurate results.
- Data Integration: When combining multiple raster datasets, they should ideally share the same resolution.
- Visual Clarity: Adjusting pixel sizes can enhance the readability of maps.
Method 1: Using ArcGIS
Steps to Change Pixel Size in ArcGIS
-
Open ArcGIS: Launch ArcGIS Pro or ArcMap.
-
Add Your Raster: Use the Add Data button to load your raster into the project.
-
Open the Geoprocessing Pane:
- In ArcGIS Pro, go to the Analysis tab and click on Tools.
- In ArcMap, access the Geoprocessing menu and choose Search for Tools.
-
Find the Resample Tool:
- Search for Resample in the Geoprocessing pane.
-
Configure the Tool:
- Input Raster: Select your raster dataset.
- Output Raster: Specify the path and name for the output raster.
- Cell Size: Enter the new pixel size (e.g., 30).
- Resampling Technique: Choose a method (e.g., Nearest, Bilinear, Cubic).
-
Run the Tool: Click the Run button to execute the resampling.
Additional Notes
- The resampling method can impact your results. Nearest Neighbor is suitable for categorical data, while Bilinear or Cubic is better for continuous data.
Method 2: Using QGIS
Steps to Change Pixel Size in QGIS
-
Open QGIS: Launch the QGIS application.
-
Load Your Raster: Click on Add Raster Layer to load your raster file.
-
Open the Warp Tool:
- Go to Raster > Projections > Warp (Reproject).
-
Configure the Tool:
- Input Layer: Select your raster.
- Output File: Specify the output path and name.
- Target SRS: If needed, select a new CRS.
- Resolution: Enter the new pixel size.
- Resampling Method: Choose between Nearest Neighbour, Bilinear, or Cubic.
-
Run the Tool: Click Run to execute the process.
-
Check the Output: Verify the new raster properties.
Additional Notes
- You can also use the Translate and Resample Raster tools in QGIS for similar results, depending on your needs.
Method 3: Using Python (with Rasterio)
If you prefer a programmatic approach, you can use Python with the rasterio library to change the pixel size of a raster.
Prerequisites
Make sure you have the necessary libraries installed:
pip install rasterio numpy
Example Code
Here’s how to change the pixel size using Python:
import rasterio
from rasterio.enums import Resampling

# Specify the input and output file paths
input_raster = '/Volumes/Private/GIS&RS/SACLASS2/saclass/dataset/image/MSK30m/N09E104/N09E104_MSK_10m.tif'
output_raster = 'output_resampled.tif'

# Set a new pixel size appropriate for your raster
new_pixel_size = 0.0001  # Adjust this based on your original raster resolution

# Open the input raster
with rasterio.open(input_raster) as src:
    # Check original raster dimensions and resolution
    original_width = src.width
    original_height = src.height
    original_res = src.res
    print(f"Original Width: {original_width}, Original Height: {original_height}")
    print(f"Original Resolution: {original_res}")

    # Calculate the new width and height
    new_width = int(original_width * (original_res[0] / new_pixel_size))
    new_height = int(original_height * (original_res[1] / new_pixel_size))
    print(f"Calculated New Width: {new_width}, New Height: {new_height}")

    # Check if new dimensions are valid
    if new_width <= 0 or new_height <= 0:
        raise ValueError("Calculated new dimensions are non-positive.")

    # Define the transformation for the new raster
    transform = src.transform * src.transform.scale(
        (original_width / new_width),
        (original_height / new_height)
    )

    # Create a new raster with the specified parameters
    with rasterio.open(
        output_raster,
        'w',
        driver='GTiff',
        height=new_height,
        width=new_width,
        count=src.count,
        dtype=src.dtypes[0],
        crs=src.crs,
        transform=transform,
    ) as dst:
        # Resample and write the data to the new raster
        for i in range(1, src.count + 1):
            data = src.read(i, out_shape=(new_height, new_width), resampling=Resampling.bilinear)
            dst.write(data, i)

print(f"Resampled raster saved as: {output_raster}")
Explanation
- Open the Input Raster: Load the raster file to gather metadata.
- Calculate New Dimensions: Compute the new width and height based on the desired pixel size.
- Define Transformation: Adjust the raster's transform for the new dimensions.
- Create Output Raster: Write the new raster with the specified parameters.
- Resample and Write Data: Resample each band and write it to the new raster.
Conclusion
Changing the pixel size of a raster is an essential task in geospatial analysis and visualization. Whether you choose to use ArcGIS, QGIS, or Python, each method has its advantages and can help you achieve the desired results.
Feel free to share your experiences or questions in the comments below! Happy mapping!

0% Positive Review (0 Comments)